
Contents of this article
With an alias, mail for an extra address arrives in a mailbox you already have. For example, mail for verkoop@voorbeeld.nl then simply lands in the mailbox info@voorbeeld.nl. You read it with the same password and in the same mail program; an alias has no password and no storage of its own. The control panel is in Dutch, so labels are given in Dutch with a translation where needed.
Alias, forwarder or copy?
- Alias: an extra address that arrives in one mailbox on the same domain.
- Forwarder (Doorstuuradres): an address without a mailbox that forwards mail to one or more other addresses, including addresses outside your domain. See Create a forwarder.
- Forward a copy (Kopie doorsturen): the mailbox keeps the mail and another address gets a copy.
Add an alias from the mailbox
-
Open the mailbox
Go to E-mail for your domain via Mijn diensten (My services). Click + alias (1) next to the mailbox, or open it with Bewerken (edit) (2). You arrive at that mailbox's Aliassen (aliases) block.

-
Enter the name
Under Alias toevoegen (add alias) (3), type the part before the @, for example
verkoop, and click Toevoegen (add) (4).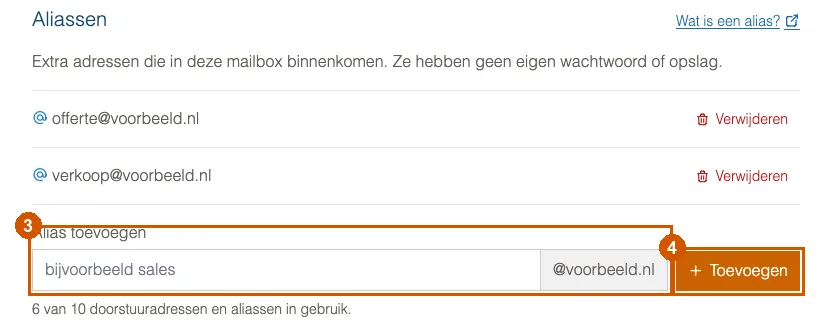
The alias then appears in the overview next to the mailbox, after Ook: (also).
Add an alias via Nieuw e-mailadres (New email address)
-
Choose Alias op een mailbox
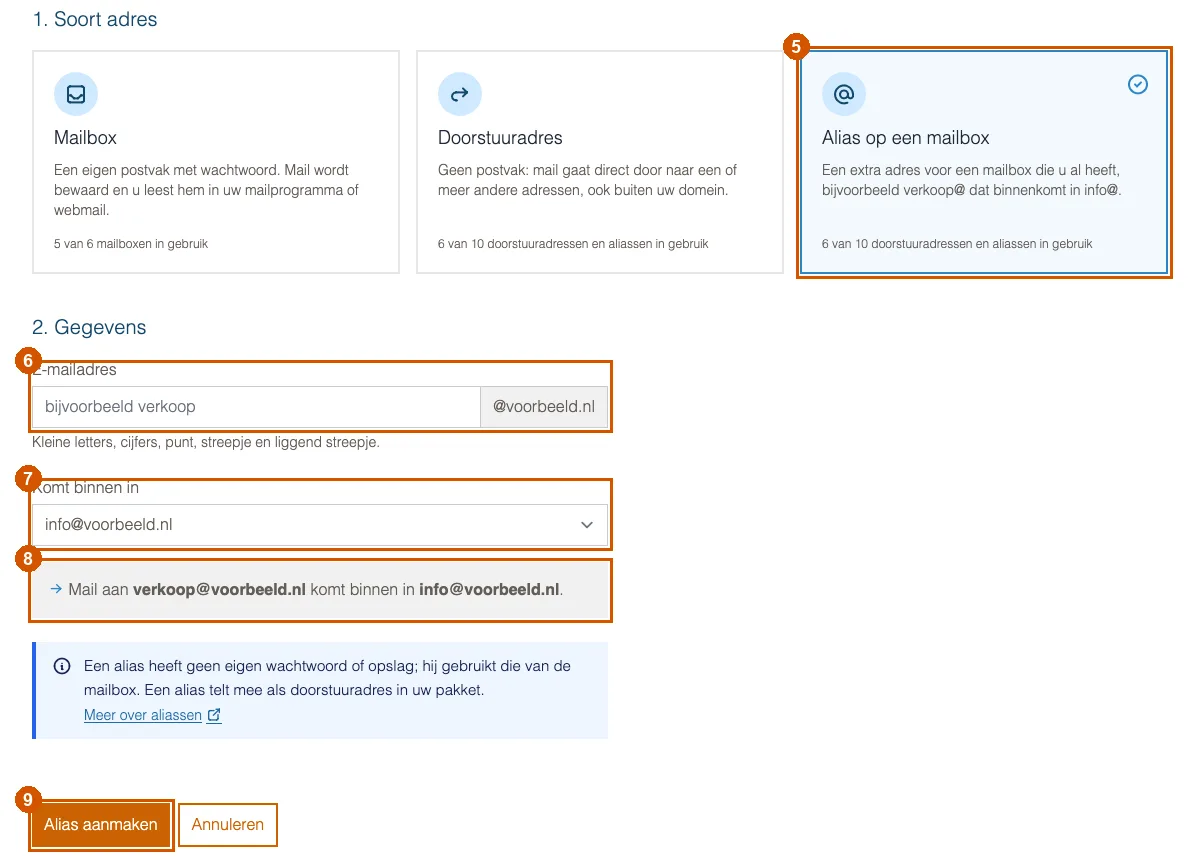
In the email overview, click Nieuw e-mailadres (new email address) and under 1. Soort adres (type of address) choose the Alias op een mailbox (alias on a mailbox) card (5).
-
Enter the address and choose the mailbox
Type the name before the @ under E-mailadres (email address) (6) and choose the mailbox under Komt binnen in (arrives in) (7). Below that you see where the mail will go (8). Click Alias aanmaken (create alias) (9).
Good to know
- An alias counts as a forwarder in your package. Once you reach the maximum, you can't add more aliases.
- If the mailbox is suspended, mail for its aliases is refused as well.
- You remove an alias on the mailbox's page, under Aliassen. When you delete the mailbox itself, you choose whether its aliases are deleted as well.
If it doesn't work
If the control panel says the address already exists, that name is already in use as a mailbox, forwarder or alias. Choose another name, or delete the existing address first. If you're stuck, email support@hostage.nl.
Was this article helpful?
Thank you for your feedback.
Thank you. What were you missing? Let us know at support@hostage.nl and we will add it to the article.
Related articles
- Set up a catch-all (and why you probably shouldn't) Have mail for non-existent addresses on your domain arrive in one mailbox, or turn that off again.
- Create a mailbox in the control panel Create a new email address with its own mailbox, storage and password.
- Change a mailbox password Set a new password for a mailbox in the control panel.
- Create a forwarder in the control panel Have mail for an address forwarded automatically to one or more other addresses.
Still stuck?
Send us a message. We will help you, usually within one working day.